Theme images by kelvinjay. Powered by Blogger.

RHEL

HTML

MCSA

HACKING & TRICKS

How To Configure YUM Server and Client In RHEL 7 ...!!!

How To Configure YUM Server and Client In RHEL 7 ...!!!


Yum Server Configuring

Yum server IP = 192.168.0.1
Yum server hostname = server1.example.com

First Should be flush the iptables and restart the network service :- 
1) iptables -L
2) iptables -F
3) service iptables save
4) service iptables restart
5) service network restart
6) setenforce 0

Step 1: Insert the RHEL 7.1 CD

[root@server Desktop]# cd /run/media/root/RHEL-7.1\ Server.x86_64/Packages/

Yum server required packages

[root@server1 Packages]# rpm -ivh vsftpd*
[root@server1 Packages]# rpm -ivh deltarpm-3.5-0.5.20090913git.el6.x86_64.rpm
[root@server1 Packages]# rpm -ivh createrepo-0.9.8-4.el6.noarch.rpm


Step 2 : FTP service start

[root@server1 Packages]# service vsftpd status

[root@server1 Packages]# service vsftpd start

[root@server1 Packages]# service vsftpd status

[root@server1 Packages]# chkconfig vsftpd on


Step 3: Copy the rhel6 dvd content

[root@server Packages]# cd

[root@server ~]# cp -rf /run/media/root/RHEL-7.1\ Server.x86_64/  /var/ftp/pub/

[root@server ~]# cd /var/ftp/pub/
[root@server pub]# ls
RHEL-7.1 Server.x86_64


Step 4: Single mode installation createrepo

[root@server ~]# createrepo -v /var/ftp/pub/

[root@server ~]# cd /var/ftp/pub/


Step 5 : Create the repo file

[root@server ~]# vim /etc/yum.repos.d/server.repo
[rhel]
name=rhel7.1
baseurl=file:///var/ftp/pub
enabled=1
gpgcheck=0


[root@server ~]# yum repolist

--------------------------------------------------------------------------------------------------------------------------

Yum Client Repo Configuring

Yum client IP = 192.168.0.2
Yum client hostname = client1.example.com


Step 1 : Create the repo file

1) setenforce 0

[root@client1~]# vim /etc/yum.repos.d/client.repo
[client1]
name=rhel7.1
baseurl=ftp://192.168.0.1/pub
enabled=1
gpgcheck=0


Input / Output Redirection...!!! Presented By :- Akash Patel

Input / Output Redirection

Presented By :-  Akash Patel


Three standard file descriptors :-


1. stdin 0 - Standard input to the program.
2. stdout 1 - Standard output from the program.
3. stderr 2 - Standard error output from the program.

Purpose & Command :-

                                                         
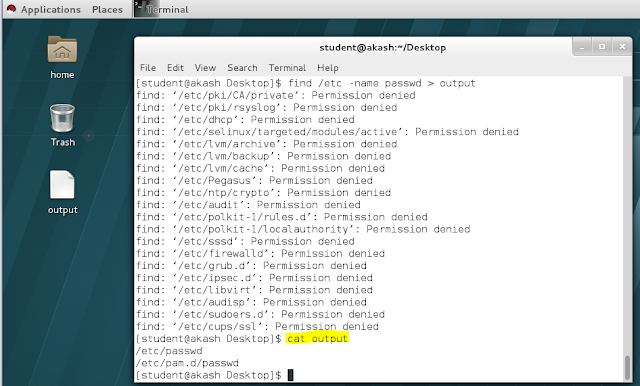
1) redirect std output to filename:-                        > filename or 1> filename

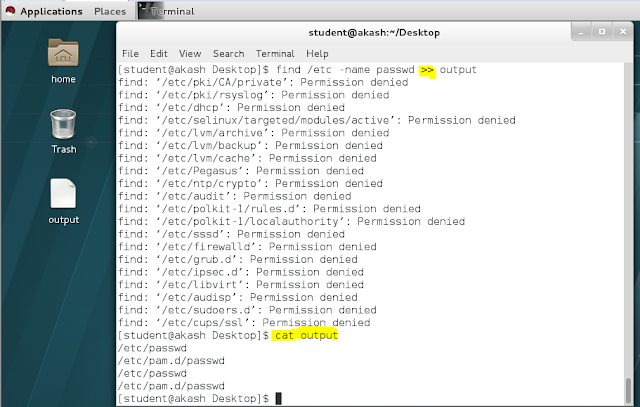
2) append std out to filename:-                              >> filename

3) append std out and std error to filename :-        >> filename 2>&1 or 1>> filename 2>&1

4) take input from filename :-                                < filename or 0 < filename

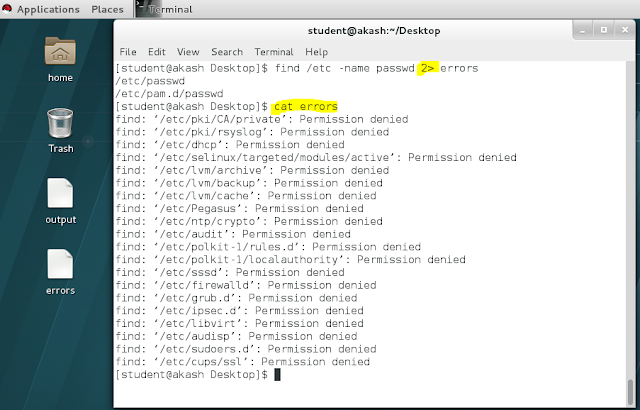
5) redirect std error to filename :-                          2> filename

6) redirect std out and std error to filename :- 1> filename 2>&1 or > filename 2>&1


Some examples of using I/O redirection :-

1. Simple output _ errors :-


2. Output in file _ error in display :-


3. Appending output in file :-


4. Redirect errors in file :-


5. Append errors as previous :-


6. Discarding errors _ send to null=0 :-


7. Save output _ error in one file :-


8. Save output _ error in seprate file :-


Configure SSH key-based authentication....!!!

Configure SSH key-based authentication


Instead of connecting through login/password to a remote host, SSH allows you to use key-based authentication. To set up key-based authentication, you need two virtual/physical servers that we will call server1 and server2.

1) Configuration Procedure

STEP:-1  On the server1, create a user user01 with password user01:


STEP:-2  On the server2, create the same user with password user01:


STEP:-3  On the server1, connect as this new user:


STEP:-4  Generate a private/public pair for key-based authentication :


STEP:-5 Still on server1, copy the public key to server2 :


STEP:-6 On the server2, edit the /etc/ssh/sshd_config file and set the following options:


2) Testing Time

STEP:-1 On the server1 as user01, connect to the server2:


How To Reset/Break Root User Password In RHEL 7..!!

How To Reset/Break Root User Password In RHEL 7..!!


STEP-1 : If your Linux system is currently running, reboot it. If it is not yet running, start it up. At the boot menu, press the ‘e’ key to edit the first boot entry.


STEP-2 : From the grub options, find the line that starts with “linux16” and go to the end of it. Enter ‘rd.break’ without quotes at the end of this line, as shown below and Press “Ctrl+x” to boot with these options. This will boot to the initramfs prompt with a root shell.


STEP-3 : At this stage, the root file system is mounted in read only mode to /sysroot and must be remounted with read/write (rw) permissions in order for us to actually make any changes. This is done with the ‘mount -o remount,rw /sysroot’ command.


STEP-4 : Once the file system has been remounted, change into a chroot so that /sysroot is used as the root of the file system. This is required so that any further commands we run will be in regards to /sysroot. This is done by running ‘chroot /sysroot’.


STEP-5 : From here the root password can be reset with the ‘passwd’ command.


STEP-6 : If you’re not using SELinux, you could reboot at this point and everything would be fine, however by default CentOS/RHEL 7 use SELinux in enforcing mode, so we need to fix the context of the /etc/shadow file. This is because when the ‘passwd’ command is run, it creates a new /etc/shadow file. As SELinux is not running in this mode the file is created with no SELinux contexts, which can cause problems when we reboot. Create the /.autorelabel command using ‘touch’.Creating this file will automatically perform a relabel of all files on next boot.


STEP-7 : Enter the ‘exit’ command twice, the first one will exit the chroot environment while the second will exit the initramfs root shell and reboot the system.


Once the reboot is completed you will be able to use the root account with your new password.

How to Make Invisible Password Protected Folder...

How to Make Invisible Password Protected Folder


Do you want to password protect your folder? Do you want to make it invisible so that it remains unnoticed by the normal users? Well here is a way to do that. In this post I will show you how to make a password protected folder in Windows without using any additional software. Here is is step by step procedure to create a password protected folder.

How to create a Password Protected Folder?

Step-1: Create a new folder (Right-click -> New -> Folder) and give it any name of your choice. For instance I name it as ABC.

Step-2: Now in this folder place all the important files, documents or any folders that you want to password protect.

Step-3: Now Right-click on this folder (ABC) and select the option Send To -> Compressed (zipped) Folder.

Step-4: Now a new compressed zipped folder gets created next this folder (ABC) with the same name.

Step-5: Double-click on this compressed zipped folder and you should see your original folder (ABC) here.

Step-6: Now goto the File menu and select the option Add a password.
ie: File -> Add a password

Now a small window will pop up and here you can set your desired password. Once the password is set, the folder will ask for the password every time it is opened. Thus you have now created the password protected folder.

How to make it Invisible?

Step-1: Now Right-click on this password protected folder and select Properties.

Step-2: At the bottom select the option Hidden and press OK. Now your folder gets invisible (hidden).

Step-3: In order to unhide this folder go to My Computer – >Tools -> Folder options. Switch to View tab, scroll down and under Hidden files and folders you’ll see the following two options

  • Do not show hidden files and folders
  • Show hidden files and folders
Now select the second option and press OK. Now the invisible folder becomes visible in it’s location. To access it you need the password. To make it invisible again repeat step -1 through step-3 and select the first option and click OK. Now the folder becomes invisible once again.

I hope you like this post. Pass your comments!!

How To Make more than thousands of folder Using Notepad...!!

How To Make more than thousands of folder Using Notepad...


1. Open notepad. 

2. Copy the following code:

@echo off
:top
md %random%
goto top

3. save it as fun.bat

If you will open that file that folder will be rained by more than thousand of folders. It will not cause any harm to your computer, if you want you can try this.

Methods that are being used to hack a website...!!!!

Methods that are being used to hack a website...!!!!


Hello friends , today i will explain all the methods that are being used to hack a website or websites database.

Note : This post is only for Educational Purpose only.

What are basic things you should know before website hacking?

First of all everything is optional as i will start from very scratch. But you need atleast basic knowledge of following things..

1. Basics of HTML, SQL, PHP.
2. Basic knowledge of Javascript.
3. Basic knowledge of servers that how servers work.
4. And most important expertize in removing traces otherwise u have to suffer consequences.

Now First two things you can learn from a very famous website for basics of Website design with basics of HTML,SQL,PHP and javascript.
http://www.w3schools.com/

And for the fourth point that you should be expert in removing traces. I will explain this in my future articles. So keep reading.. or simply subscribe my posts..

As we know traces are very important. Please don't ignore them otherwise you can be in big trouble for simply doing nothing. so please take care of this step.

METHODS OF HACKING WEBSITE:

1. SQL INJECTION
2. CROSS SITE SCRIPTING
3. REMOTE FILE INCLUSION
4. LOCAL FILE INCLUSION
5. DDOS ATTACK
6. EXPLOITING VULNERABILITY.

1. SQL INJECTION

First of all what is SQL injection? SQL injection is a type of security exploit or loophole in which a attacker "injects" SQL code through a web form or manipulate the URL's based on SQL parameters. It exploits web applications that use client supplied SQL queries.
The primary form of SQL injection consists of direct insertion of code into user-input variables that are concatenated with SQL commands and executed. A less direct attack injects malicious code into strings that are destined for storage in a table or as metadata. When the stored strings are subsequently concatenated into a dynamic SQL command, the malicious code is executed.

2. CROSS SITE SCRIPTING

Cross site scripting (XSS) occurs when a user inputs malicious data into a website, which causes the application to do something it wasn’t intended to do. XSS attacks are very popular and some of the biggest websites have been affected by them including the FBI, CNN, Ebay, Apple, Microsft, and AOL.Some website features commonly vulnerable to XSS attacks are:
• Search Engines
• Login Forms
• Comment Fields

Cross-site scripting holes are web application vulnerabilities that allow attackers to bypass client-side security mechanisms normally imposed on web content by modern browsers. By finding ways of injecting malicious scripts into web pages, an attacker can gain elevated access privileges to sensitive page content, session cookies, and a variety of other information maintained by the browser on behalf of the user. Cross-site scripting attacks are therefore a special case of code injection.

I will explain this in detail in later hacking classes. So keep reading..


3. REMOTE FILE INCLUSION

Remote file inclusion is the most often found vulnerability on the website.
Remote File Inclusion (RFI) occurs when a remote file, usually a shell (a graphical interface for browsing remote files and running your own code on a server), is included into a website which allows the hacker to execute server side commands as the current logged on user, and have access to files on the server. With this power the hacker can continue on to use local
exploits to escalate his privileges and take over the whole system.
RFI can lead to following serious things on website :
Code execution on the web server
Code execution on the client-side such as Javascript which can lead to other attacks such as cross site scripting (XSS).
Denial of Service (DoS)
Data Theft/Manipulation


4. LOCAL FILE INCLUSION 

Local File Inclusion (LFI) is when you have the ability to browse through the server by means of directory transversal. One of the most common uses of LFI is to discover the /etc/passwd file. This file contains the user information of a Linux system. Hackers find sites vulnerable to LFI the same way I discussed for RFI’s.
Let’s say a hacker found a vulnerable site, www.target-site.com/index.php?p=about, by means of directory transversal he would try to browse to the /etc/passwd file:
www.target-site.com/index.php?p= ../../../../../../../etc/passwd


I will explain it in detail with practical websites example in latter sequential classes on Website Hacking.


5. DDOS ATTACK

Simply called distributed denial of service attack. A denial-of-service attack (DoS attack) or distributed denial-of-service attack (DDoS attack) is an attempt to make a computer resource unavailable to its intended users. Although the means to carry out, motives for, and targets of a DoS attack may vary, it generally consists of the concerted efforts of a person or people to prevent an Internet site or service from functioning efficiently or at all, temporarily or indefinitely. In DDOS attack we consumes the bandwidth and resources of any website and make it unavailable to its legitimate users.

6.EXPLOTING VULNERABILITY

Its not a new category it comprises of above five categories but i mentioned it separately because there are several exploits which cannot be covered in the above five categories. So i will explain them individually with examples. The basic idea behind this is that find the vulnerability in the website and exploit it to get the admin or moderator privileges so that you can manipulate the things easily.

How To Configure YUM Server and Client In RHEL 7 ...!!!

How To Configure YUM Server and Client In RHEL 7 ...!!! Yum Server Configuring Yum server IP = 192.168.0.1 Yum server hostname = s...