Theme images by kelvinjay. Powered by Blogger.

RHEL

HTML

MCSA

HACKING & TRICKS

How To Configure YUM Server and Client In RHEL 7 ...!!!

How To Configure YUM Server and Client In RHEL 7 ...!!!


Yum Server Configuring

Yum server IP = 192.168.0.1
Yum server hostname = server1.example.com

First Should be flush the iptables and restart the network service :- 
1) iptables -L
2) iptables -F
3) service iptables save
4) service iptables restart
5) service network restart
6) setenforce 0

Step 1: Insert the RHEL 7.1 CD

[root@server Desktop]# cd /run/media/root/RHEL-7.1\ Server.x86_64/Packages/

Yum server required packages

[root@server1 Packages]# rpm -ivh vsftpd*
[root@server1 Packages]# rpm -ivh deltarpm-3.5-0.5.20090913git.el6.x86_64.rpm
[root@server1 Packages]# rpm -ivh createrepo-0.9.8-4.el6.noarch.rpm


Step 2 : FTP service start

[root@server1 Packages]# service vsftpd status

[root@server1 Packages]# service vsftpd start

[root@server1 Packages]# service vsftpd status

[root@server1 Packages]# chkconfig vsftpd on


Step 3: Copy the rhel6 dvd content

[root@server Packages]# cd

[root@server ~]# cp -rf /run/media/root/RHEL-7.1\ Server.x86_64/  /var/ftp/pub/

[root@server ~]# cd /var/ftp/pub/
[root@server pub]# ls
RHEL-7.1 Server.x86_64


Step 4: Single mode installation createrepo

[root@server ~]# createrepo -v /var/ftp/pub/

[root@server ~]# cd /var/ftp/pub/


Step 5 : Create the repo file

[root@server ~]# vim /etc/yum.repos.d/server.repo
[rhel]
name=rhel7.1
baseurl=file:///var/ftp/pub
enabled=1
gpgcheck=0


[root@server ~]# yum repolist

--------------------------------------------------------------------------------------------------------------------------

Yum Client Repo Configuring

Yum client IP = 192.168.0.2
Yum client hostname = client1.example.com


Step 1 : Create the repo file

1) setenforce 0

[root@client1~]# vim /etc/yum.repos.d/client.repo
[client1]
name=rhel7.1
baseurl=ftp://192.168.0.1/pub
enabled=1
gpgcheck=0


Input / Output Redirection...!!! Presented By :- Akash Patel

Input / Output Redirection

Presented By :-  Akash Patel


Three standard file descriptors :-


1. stdin 0 - Standard input to the program.
2. stdout 1 - Standard output from the program.
3. stderr 2 - Standard error output from the program.

Purpose & Command :-

                                                         
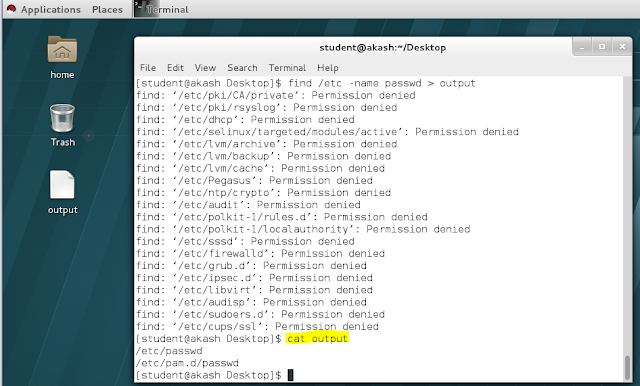
1) redirect std output to filename:-                        > filename or 1> filename

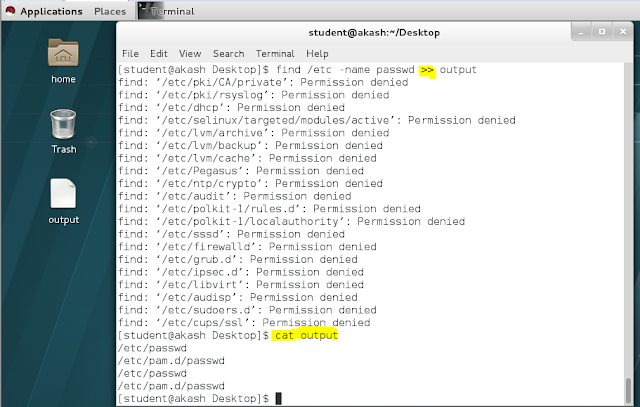
2) append std out to filename:-                              >> filename

3) append std out and std error to filename :-        >> filename 2>&1 or 1>> filename 2>&1

4) take input from filename :-                                < filename or 0 < filename

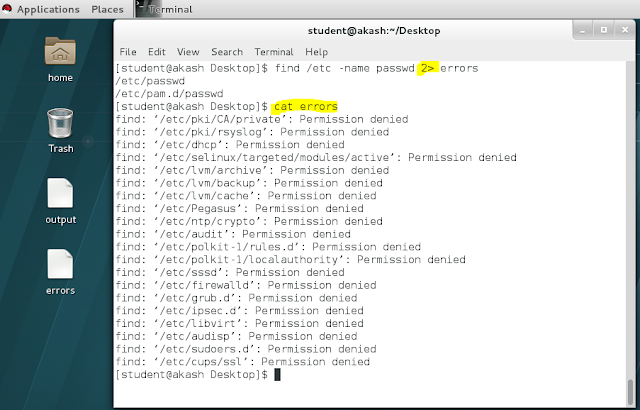
5) redirect std error to filename :-                          2> filename

6) redirect std out and std error to filename :- 1> filename 2>&1 or > filename 2>&1


Some examples of using I/O redirection :-

1. Simple output _ errors :-


2. Output in file _ error in display :-


3. Appending output in file :-


4. Redirect errors in file :-


5. Append errors as previous :-


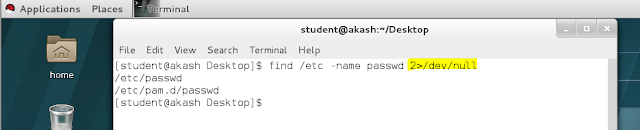
6. Discarding errors _ send to null=0 :-


7. Save output _ error in one file :-


8. Save output _ error in seprate file :-


Configure SSH key-based authentication....!!!

Configure SSH key-based authentication


Instead of connecting through login/password to a remote host, SSH allows you to use key-based authentication. To set up key-based authentication, you need two virtual/physical servers that we will call server1 and server2.

1) Configuration Procedure

STEP:-1  On the server1, create a user user01 with password user01:


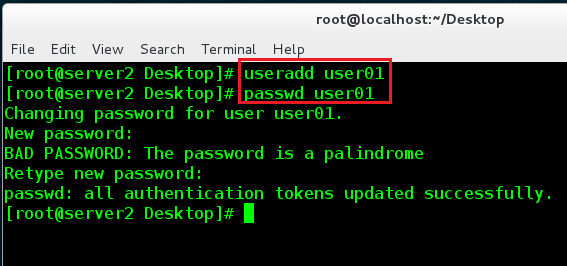
STEP:-2  On the server2, create the same user with password user01:


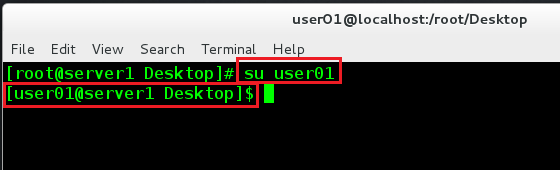
STEP:-3  On the server1, connect as this new user:


STEP:-4  Generate a private/public pair for key-based authentication :


STEP:-5 Still on server1, copy the public key to server2 :


STEP:-6 On the server2, edit the /etc/ssh/sshd_config file and set the following options:


2) Testing Time

STEP:-1 On the server1 as user01, connect to the server2:


How To Reset/Break Root User Password In RHEL 7..!!

How To Reset/Break Root User Password In RHEL 7..!!


STEP-1 : If your Linux system is currently running, reboot it. If it is not yet running, start it up. At the boot menu, press the ‘e’ key to edit the first boot entry.


STEP-2 : From the grub options, find the line that starts with “linux16” and go to the end of it. Enter ‘rd.break’ without quotes at the end of this line, as shown below and Press “Ctrl+x” to boot with these options. This will boot to the initramfs prompt with a root shell.


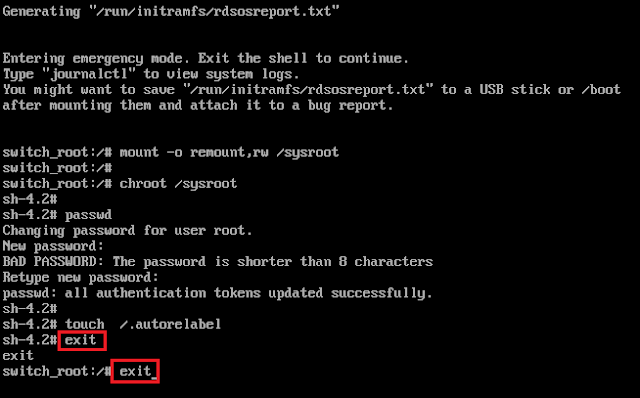
STEP-3 : At this stage, the root file system is mounted in read only mode to /sysroot and must be remounted with read/write (rw) permissions in order for us to actually make any changes. This is done with the ‘mount -o remount,rw /sysroot’ command.


STEP-4 : Once the file system has been remounted, change into a chroot so that /sysroot is used as the root of the file system. This is required so that any further commands we run will be in regards to /sysroot. This is done by running ‘chroot /sysroot’.


STEP-5 : From here the root password can be reset with the ‘passwd’ command.


STEP-6 : If you’re not using SELinux, you could reboot at this point and everything would be fine, however by default CentOS/RHEL 7 use SELinux in enforcing mode, so we need to fix the context of the /etc/shadow file. This is because when the ‘passwd’ command is run, it creates a new /etc/shadow file. As SELinux is not running in this mode the file is created with no SELinux contexts, which can cause problems when we reboot. Create the /.autorelabel command using ‘touch’.Creating this file will automatically perform a relabel of all files on next boot.


STEP-7 : Enter the ‘exit’ command twice, the first one will exit the chroot environment while the second will exit the initramfs root shell and reboot the system.


Once the reboot is completed you will be able to use the root account with your new password.

Creating, Viewing and Editing Text Files In Linux

Creating, Viewing and Editing Text Files In Linux


Option-1 :- Create File Using Touch and Edit Using Gedit Command. 


Option-2 :- Create File Using Touch and Edit Using Vim Command. 


Option-3 :- Create and Edit File Using Cat Command. 


10 Most Important Linux Commands


10 Most Important Linux Commands

1. ls

The ls command - the list command - functions in the Linux terminal to show all of the major directories filed under a given file system. For example, the command:


ls /applications

...will show the user all of the folders stored in the overall applications folder.

The ls command is used for viewing files, folders and directories.


2. cd

The cd command - change directory - will allow the user to change between file directories. As the name command name suggest, you would use the cd command to circulate between two different directories. For example, if you wanted to change from the home directory to the Nik directory, you would input the following command:


cd/nik/applications


As you might have noted, the path name listed lists in reverse order. Logically cd/nik/applications reads change to the nik directory which is stored in the applications directory. All Linux commands follow a logical path.


3. mv

The mv command - move - allows a user to move a file to another folder or directory. Just like dragging a file located on a PC desktop to a folder stored within the "Documents" folder, the mv command functions in the same manner. An example of the mv command is:


mv/nik/applications/majorapps  /nik/applications/minorapps


The first part of the command mv/nik/applications/majorapps lists the application to be moved. In this case, nik. The second part of the command /nik/applications/minorapps lists where nik will be moved to - from majorapps to minorapps.

4. man

The man command - the manual command - is used to show the manual of the inputted command. Just like a film on the nature of film, the man command is the meta command of the Linux CLI. Inputting the man command will show you all information about the command you are using. An example:


man cd


The inputting command will show the manual or all relevant information for the change directory command.

5. mkdir

The mkdir - make directory - command allows the user to make a new directory. Just like making a new directory within a PC or Mac desktop environment, the mkdir command makes new directories in a Linux environment. An example of the mkdir command


mkdir testdirectory


The example command made the directory "testdirectory".

6. rmdir

The rmdir - remove directory - command allows the user to remove an existing command using the Linux CLI. An example of the rmdir command:

rmdir testdirectory


The example command removed the directory "testdirectory".

It should be noted: both the mkdir and rmdir commands make and remove directories. They do not make files and they will also not remove a directory which has files in it. The mkdir will make an empty directory and the rmdir command will remove an empty directory.


7. touch

The touch command - a.k.a. the make file command - allows users to make files using the Linux CLI. Just as the mkdir command makes directories, the touch command makes files. Just as you would make a .doc or a .txt using a PC desktop, the touch command makes empty files. An example of the touch command:


touch testfile.txt


The example touch command effectively created the file testfile.txt. As noted by the extension, the file created is a .txt or text file. To equate, a .txt file in Linux is akin to a .txt notebook file within a Windows or Mac OS.


8. rm

The rm command - remove - like the rmdir command is meant to remove files from your Linux OS. Whereas the rmdir command will remove directories and files held within, the rm command will delete created files. An example of the rm command:


rm testfile.txt


The aforementioned command removed testfile.txt. Interestingly, whereas the rmdir command will only delete an empty directory, the rm command will remove both files and directories with files in it. This said, the rm command carries more weight than the rmdir command and should be used with more specificity.

9. locate

The locate - a.k.a. find - command is meant to find a file within the Linux OS. If you don't know the name of a certain file or you aren't sure where the file is saved and stored, the locate command comes in handy. A locate command example:


locate -i *red*house**city*


The stated command will locate an file with the a file name containing "Red", "House" and "City". A note on the input: the use of "-i" tells the system to search for a file unspecific of capitalization (Linux functions in lower case). The use of the asterik "*" signifies searching for a wildcard. A wildcard tells the system to pull any and all files containing the search criteria.

By specifying -i with wildcards, the locate CLI command will pull back all files containing your search criteria effectivley casting the widest search net the system will allow.

10. clear

The clear command does exactly what it says. When your Linux CLI gets all mucked up with various readouts and information, the clear command clears the screen and wipes the board clean. Using the clear command will take the user back to the start prompt of whatever directory you are currently operating in. To use the clear command simply type clear.

How to Add a New User in Linux


1. How to Add a New User in Linux


To add/create a new user, all you’ve to follow the command ‘useradd‘ or ‘adduser‘ with ‘username’. The ‘username’ is a user login name, that is used by user to login into the system.

Only one user can be added and that username must be unique (different from other username already exists on the system).
For example, to add a new user called ‘itims‘, use the following command.

[root@nikunj ~]# useradd itims

When we add a new user in Linux with ‘useradd‘ command it gets created in locked state and to unlock that user account, we need to set a password for that account with ‘passwd‘ command.

[root@nikunj ~]# passwd itims
Changing password for user itims.
New UNIX password:
Retype new UNIX password:
passwd: all authentication tokens updated successfully.

Once a new user created, it’s entry automatically added to the ‘/etc/passwd‘ file. The file is used to store users information and the entry should be.

itims:x:504:504:tecmint:/home/itims:/bin/bash

The above entry contains a set of seven colon-separated fields, each field has it’s own meaning. Let’s see what are these fields:
  1.   Username: User login name used to login into system. It should be between 1         to 32 charcters long.
2.   Password: User password (or x character) stored in /etc/shadow file in encrypted format.

3.   User ID (UID): Every user must have a User ID (UID) User Identification Number. By default UID 0 is reserved for root user and UID’s ranging from 1-99 are reserved for other predefined accounts. Further UID’s ranging from 100-999 are reserved for system accounts and groups.

4.   Group ID (GID): The primary Group ID (GID) Group Identification Number stored in /etc/group file.

5.   User Info: This field is optional and allow you to define extra information about the user. For example, user full name. This field is filled by ‘finger’ command.

6.   Home Directory: The absolute location of user’s home directory.

7.   Shell: The absolute location of a user’s shell i.e. /bin/bash.

How To Install RHEL 7 on VMware

To install RHEL 7 on VMware, you need to perform the following steps:

1.    Open the VMware Workstation or Player console and click Create a New Virtual Machine. Select the installation source such as Installer disc image file (iso): radio button. Browse and select the RHEL 7 ISO image file. 


2.    Click Next to proceed. On the Select a Guest Operating System page, select Linuxas the guest operating system and RHEL 7 as the version. If RHEL 7 is not available in the version drop-down list, select the RHEL 6 (64-bit) and then click Next to proceed.


3.    On the Name and Virtual Machine page, specify the name and location for the virtual machine and then click Next to proceed. 


4.    In the Specify Disk Capacity page, set the desired disk size (20 GB would be enough for the testing purpose). Select the Store virtual disk as a single file option and click Next to proceed. 


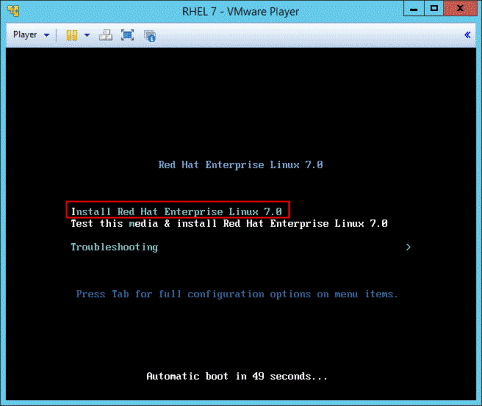
5.    On the Ready to Create Virtual Machine page, click Finish. Power on the created virtual machine. On the boot options, select Install Red Hat Enterprise Linux 7.0and press Enter.


6.    When you are asked, press again Enter to begin the installation process. On the Welcome page, select the language and click Continue.


7.    On the Installation Summary page, click SOFTWARE SELECTION and select Server with GUI option. The default package selection does not contain the GUI packages. Hence, if you do not select GUI packages manually, you will not be able to switch into the graphical user interface. 


8.    Click INSTALLATION DESTINATION. On the Device Selection screen, accept the Automatically configure partitioning option and click Done. If you are already familiar with disk partitioning in Linux, create partitions with your custom settings, else better to accept the default selection. 


9.    The summary screen returns, click Begin Installation. On the configuration screen, set the desired root password. You may also create additional users during the installation process if you wish. 


10. The installation process starts. It may take 15-20 minutes. Wait until the installation process completes.

11. Reboot the virtual machine. Accept the license terms and finish the installation. You may also be asked to set the Kdump memory and subscription management. Once the system is rebooted, follow the on-screen instruction to set the basic settings such as keyboard language and time zone.

12. On the Login screen, login with root user and use your first RHEL 7 server.

That’s all you need to do to install RHEL 7 on VMware Workstation/Player. Hope, it helped you. Stay connected for the upcoming articles.

How To Configure YUM Server and Client In RHEL 7 ...!!!

How To Configure YUM Server and Client In RHEL 7 ...!!! Yum Server Configuring Yum server IP = 192.168.0.1 Yum server hostname = s...